The handheld 3D scanner market is growing at around 13% CAGR, driven by demand from surveyors, facility managers, and robotics teams who need point cloud data without the cost and setup of a terrestrial scanner setup. Most product datasheets skip an important detail: picking the right LiDAR sensor for a handheld 3D scanner is a fundamentally different problem than selecting one for a robot or a vehicle.
A handheld scanner operator moves unpredictably. The sensor gets tilted, rotated, and carried at varying heights. It works indoors where walls are close, and sometimes outdoors where targets are far. The weight budget is tight — every gram matters when someone is holding a device for 30 minutes straight. Power is limited to whatever a battery pack can deliver.
This guide walks through the sensor-level decisions that matter for handheld scanning, compares four categories of LiDAR in realistic scenarios, and includes something you won't find elsewhere: a breakdown of how the same Livox M360 behaves differently when configured for AGV navigation versus handheld SLAM mapping.
What Actually Matters in a Handheld Scanning LiDAR
Most LiDAR comparison articles start with a spec table and call it a day. Specs matter, but the ranking of what matters shifts when you move the sensor from a fixed mount to someone's hand.
Point Rate and Point Density
Point rate (points per second) determines how quickly the sensor fills in detail. For handheld scanning, higher is almost always better, because the operator is moving the device past surfaces at varying speeds. A fast sweep across a wall at arm's length needs enough points to register surface features — otherwise the SLAM algorithm loses tracking.
Livox M360 outputs 200,000 points/s. The Hesai Pandar40P pushes around 600,000 points/s with its 40-channel mechanical design. LD19, by contrast, delivers 4,500 samples/s — that's a single-channel 2D sensor, and it shows.
Field of View (FOV)
Vertical FOV is the hidden variable in handheld scanning. A sensor with 360° horizontal coverage but only a 3° vertical slice (like most 2D LiDARs) captures a thin ring of the environment. You'd need to wave it up and down deliberately to get wall-to-ceiling coverage, and the point cloud will have gaps.
The M360 offers -10° to 60° vertically (70° total). That's enough to capture most of a room's geometry in a single pass if you tilt the sensor slightly. The Pandar40P has a similar vertical spread depending on channel configuration, but its mechanical scanning pattern distributes points more uniformly across the FOV.
Detection Range and Blind Zone
For indoor handheld scanning, you rarely need 200m range. Most work happens within 0.5m to 15m. What you do need is a small blind zone — the distance at which the sensor can't see anything in front of it.
The M360 has a 0.05m blind zone. LD19 can detect objects as close as 0.02m. That tight near-field capability is why LD19 survives in some handheld builds: it can scan a wall that's right next to the operator.
Weight and Power
At 408g and <4.5W average, the M360 is designed with mobile platforms in mind. The Pandar40P weighs closer to 1kg and draws 20W+ — not a dealbreaker for a vehicle, but noticeable in a handheld rig. LD19 is 70g and draws under 1W. These differences compound when you add a compute unit, battery, display, and enclosure.
IMU Quality
Handheld SLAM relies heavily on IMU data to compensate for the operator's motion between LiDAR frames. The M360's built-in ICM40609 (3-axis accelerometer + 3-axis gyro) is adequate for basic SLAM, but most serious handheld scanners supplement this with an external high-grade IMU like a VectorNav or an Xsens module. The LD19 has no built-in IMU — you're adding your own regardless.
Sensor-by-Sensor Breakdown
Livox M360
The M360 is the default answer for DIY handheld SLAM builds, and for good reason. Its non-repetitive scanning pattern — Livox's rotating-mirror hybrid-solid approach — fills in the FOV over time rather than tracing fixed lines. After a few hundred milliseconds of integration, you get near-complete coverage of the 360° × 70° FOV. For a handheld device that's constantly moving, this works well because the motion itself helps distribute the point cloud.
Strengths for handheld scanning:
- 200K pts/s fills geometry quickly
- 70° vertical FOV reduces need for deliberate up-down sweeping
- IP67 rating handles rain and dust
- 408g is light enough for practical handheld use
- Built-in IMU gives you a baseline for SLAM without extra hardware
- The Livox SDK and ROS driver are mature — FAST-LIO2 and R3LIVE both support it out of the box
Weaknesses:
- The non-repetitive pattern means instantaneous coverage is sparse — if you move too fast, individual frames look under-sampled
- 25m range at 10% reflectivity is fine for indoors but tight for outdoor facade scanning
- The 100BASE-TX Ethernet interface adds cable complexity compared to USB-C sensors
- At typical handheld scanner price points, the sensor alone (around $600–800) is a significant BOM item
For a Livox M360 handheld scanner build, the most common configuration pairs the M360 with an NVIDIA Jetson Orin Nano, a 5000mAh battery, and an external IMU. Total weight: 800g–1.2kg.
LD19 (STL-19P)
LD19 is a budget 2D LiDAR from the DTOF family. It measures 4500 samples per second in a single horizontal plane at a 10Hz sweep rate, with 360° coverage and 12m range. Cost: roughly $30–50.
Using a single-plane 2D LiDAR for handheld 3D scanning sounds questionable, and honestly, it is — unless you're on a very tight budget or building an educational prototype. The point cloud from LD19 alone is a flat ring. To get 3D data, you need to either:
- Mount it on a servo that tilts it during scanning (adds complexity and latency), or
- Rely on the operator's natural arm motion to sweep the beam vertically and hope the SLAM algorithm can reconstruct geometry from sparse, irregular sampling.
The second approach is what some ultra-low-cost builds attempt. Results are usable for rough room outlines and basic floor plans, but don't expect survey-grade accuracy or detailed surface reproduction.
Where LD19 makes sense: educational projects, proof-of-concept demos, and situations where the goal is "3D-ish" data rather than precision mapping.
Where it falls short: any application requiring detailed point cloud geometry, architectural documentation, or reliable outdoor operation (12m range is limiting).
Hesai Pandar40P
The Pandar40P is a 40-channel mechanical LiDAR originally designed for autonomous driving. It uses a spinning array of laser emitters stacked at different vertical angles, generating a dense, structured point cloud at 20Hz.
When you put the Pandar40P in a handheld rig, it's a mixed bag:
The good: 40 channels at 20Hz give you a dense point cloud in every frame. No need to wait for coverage to build up over time — each rotation paints a fairly complete picture of the environment. Range extends to ~200m at 10% reflectivity, so outdoor facade work is viable.
The challenging: At roughly 1kg and 20W+, it's heavy and power-hungry for a handheld rig. The spinning mechanism creates vibration that affects IMU readings unless you decouple the sensor mount. Mechanical wear is a concern in the long term — bearings fail, and field-replacing a spinning LiDAR mid-project isn't fun. Cost is also a factor: the Pandar40P sells in the thousands of dollars.
Verdict: Overkill for most handheld scanning applications unless you specifically need automotive-grade detection range and per-frame density. Some commercial handheld scanners do use Pandar-class sensors, but they pair them with sophisticated vibration isolation and thermal management that a DIY build won't easily replicate.
Mechanical Multi-Line LiDAR (General Category)
Beyond specific models, it's worth understanding the category. Mechanical multi-line LiDARs — Velodyne VLP-16, Ouster OS0/OS1, RoboSense RS16, etc. — share a common architecture: a vertically stacked laser array spins around a central axis.
For handheld scanning, the key tradeoffs are:
| Factor | Mechanical Multi-Line | Livox-Style Hybrid-Solid |
|---|---|---|
| Instantaneous FOV coverage | Good (every frame has full vertical spread) | Sparse (builds coverage over time) |
| Point density uniformity | Very uniform per frame | Non-uniform; denser near scan center |
| Moving-vehicle performance | Excellent (no motion integration needed) | Requires motion to fill FOV |
| Weight | Typically 400g–1kg+ | 408g (M360) |
| Power | 8–30W+ | <4.5W average |
| Vibration | Motor creates constant vibration | Near-silent operation |
| Durability | Mechanical wear over time | No moving parts in scan path |
| Cost | $500–$5,000+ | $600–$800 |
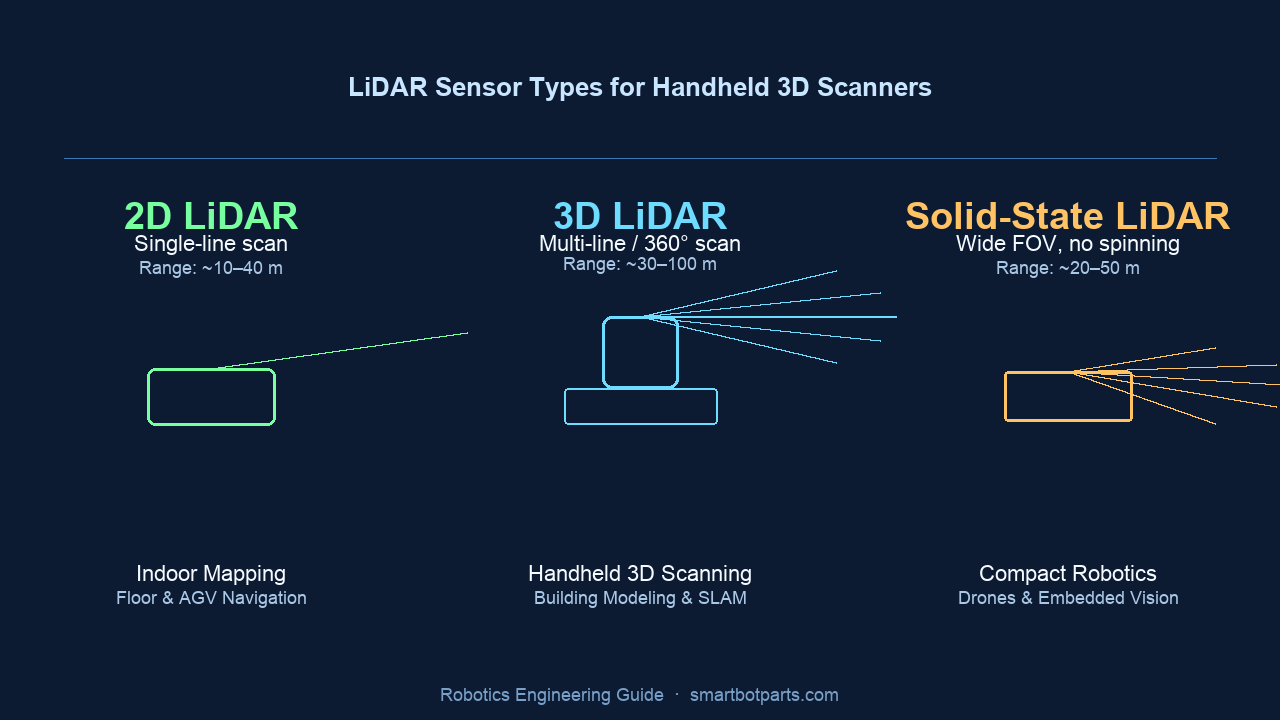
The mechanical approach wins when you need complete point clouds from each individual frame — useful for stop-and-scan workflows or mounted platforms. The hybrid-solid approach (Livox) wins when the sensor is constantly in motion (like, say, being carried through a building) because the motion naturally fills in the coverage gaps.
Same Sensor, Different World: M360 in AGV Navigation vs. Handheld Scanning
This is the part that catches engineers off guard. The Livox M360 is the same physical sensor whether it's bolted to an AGV or strapped to a handheld rig. But the configuration, firmware tuning, and SLAM parameters diverge significantly between these two use cases.
Mounting Angle
On an AGV, the M360 typically mounts horizontally (0° tilt), centered on the robot's roof, 0.8–1.2m above the ground. This gives even coverage of the floor plane for obstacle detection and wall tracking for localization.
In handheld scanner builds, experienced engineers tilt the sensor 45–60° away from the operator. Why? Three reasons:
- Operator shadow avoidance. At 0° tilt, the operator's body blocks a significant portion of the horizontal plane. Tilting the sensor forward and up moves the operator out of the sensor's primary view.
- Ground and ceiling capture. A 45° tilt with the M360's -10° to +60° vertical FOV means the sensor sees from roughly -55° to +15° relative to level. That covers the floor directly below, walls at normal distance, and portions of the ceiling — all in one pass.
- Overlap with SLAM features. Tracking features at floor level (floor texture, carpet patterns, tile joints) provides a stable reference that helps the SLAM algorithm maintain accuracy, especially in corridors with repetitive wall geometry.
Scan Pattern Configuration
The M360's non-repetitive scanning pattern can be configured for different integration times. For AGV navigation, a 0.5s integration window (roughly 0.9° horizontal resolution) is often sufficient — the robot moves slowly and needs position updates at 2Hz.
For handheld scanning, builders typically push to 2.5s integration (0.18° resolution) to maximize point density. The operator's natural walking speed of 0.5–1.5m/s means the sensor covers 1.25–3.75m of linear distance during a 2.5s window. At that density, you get detailed geometry on walls, furniture, and structural elements.
Frame Rate vs. Integration Tradeoff
AGV SLAM pipelines (like FAST-LIO2 configured for M360) often run at the sensor's native 10Hz frame rate, processing each frame independently. This prioritizes latency — the AGV needs to know where obstacles are now.
Handheld scanning can afford to trade some latency for density. Some builds accumulate multiple frames before feeding them to the SLAM backend, running at 2–4Hz but with much richer point clouds per update. This works because the operator isn't driving a 200kg robot into a wall — they can handle a few hundred milliseconds of processing delay.
IMU Usage
On an AGV, the built-in ICM40609 IMU is usually adequate. The robot moves on a flat floor at predictable speeds, and wheel odometry provides a strong additional constraint.
Handheld scanning introduces six degrees of freedom of unpredictable motion: walking, stopping, turning, crouching, raising and lowering the device. The built-in IMU helps, but serious handheld builds almost always add an external tactical-grade IMU (±0.1°/hr gyro bias stability or better). The cost difference is significant — an ICM40609-class IMU costs $3; a VectorNav VN-100 costs $500+ — but the mapping accuracy improvement justifies it for professional applications.
Power Management
AGVs run on large battery packs. The M360's <4.5W draw is negligible.
In a handheld scanner, every watt matters. A 5000mAh 3S LiPo (11.1V nominal, ~55.5Wh) running the M360 + Jetson Orin Nano + display gives roughly 45–60 minutes of operation. If the M360 enters self-heating mode in cold environments (peak power up to 14W per Livox specs), runtime drops noticeably. Builders in cold climates often add foam insulation around the sensor and pre-heat the battery.
Matching Sensor to Application
So which sensor should you choose? It depends on what you're scanning and how much you're willing to spend. Here's a practical framework:
Budget-constrained education / prototyping: LD19 or similar 2D LiDAR. Accept that you'll get rough 3D geometry at best. Cost: under $100 for the sensor. Pair with a Raspberry Pi and ROS2.
Mid-range indoor handheld scanning: Livox M360. This is the sweet spot for most robotics teams and small survey operations. The sensor alone is affordable at $600–800, and the open-source tooling (FAST-LIO2, R3LIVE, Point-LIO) is mature enough that you can have a working prototype in a weekend. Build cost for the full handheld unit: $1,200–$2,000 depending on compute and IMU choice.
Professional outdoor or large-scale scanning: Mechanical multi-line LiDAR (Pandar40P, Ouster OS0-128, etc.). You need the per-frame density and range that these sensors provide. Expect $3,000–$8,000+ for the sensor alone, with total build costs reaching $10,000+ when you factor in compute, batteries, enclosure, and calibration.
A note on low cost LiDAR 3D scanner builds: The cheapest functional handheld SLAM scanner we've seen uses a M360, an NVIDIA Jetson Orin Nano, an MPU9250 IMU ($2), and a 3D-printed enclosure. Total BOM: roughly $900. It won't match a Leica BLK2GO or a NavVis VLX, but for room-level scans and robotics research, it's surprisingly capable.
If you're upgrading from a 2D setup, our 2D to 3D LiDAR upgrade guide covers the migration path in detail. And if you're also evaluating LiDAR for near-blind-zone AGV applications (which shares some sensor requirements with handheld scanning), our AGV LiDAR near-blind-zone comparison offers relevant data.
The IMU Matters More Than You Think
A pattern we see repeatedly: engineers spend weeks comparing LiDAR datasheets, then grab the cheapest IMU they can find. In handheld scanning, this is backwards. The IMU is the backbone of your SLAM system — it provides the motion prediction that bridges between LiDAR frames. A noisy or drift-prone IMU forces the SLAM algorithm to rely more heavily on feature matching, which fails in geometrically uniform environments (long corridors, open warehouses, smooth walls).
If budget forces a choice between a better IMU and a better LiDAR, and you're building a handheld scanner: buy the better IMU. The M360 is already good enough for most indoor scanning. But the difference between a $3 MEMS IMU and a $200 tactical-grade one can be the difference between "kinda works" and "actually useful."
Bottom Line
Picking the right LiDAR sensor for a handheld 3D scanner is about matching the sensor's characteristics to how the scanner will actually be used — not about chasing the highest spec number. A $30 LD19 works for a weekend hackathon project. A Livox M360 at $700 is the pragmatic choice for most serious builds. A Pandar40P or similar is for when you need professional-grade density and range.
If you need help narrowing down sensor options for a specific handheld scanning application, or want pricing on the Livox M360 and compatible hardware, contact the SmartBotParts team. We work with robotics teams and system integrators on sensor selection every day.
Specs disclaimer: All specifications referenced in this article are from publicly available manufacturer datasheets as of mid-2026. The Livox M360 data comes from the official Livox M360 specifications page and user manual v1.2. The LD19 parameters are from the Waveshare documentation. The Hesai Pandar40P data is from the Hesai user manual. Always verify against the latest manufacturer documentation before making purchasing decisions.